Synology - Reverse Proxy with HTTP to HTTPS rewrite

Configuring DSM6 with Reverse Proxy is one of the most convenient features of the DSM 6 update compared to earlier versions, why?
- No need for a bunch of firewall openings on your local network!
- Simple to expose DSM applications (inc. Docker!)
- Clean GUI overview of exposed applications
- Simple SSL offloading
- Easy to maintain DSM application certificates, one place to change them all!
Read on to configure your Reverse Proxy ;)
This post will explain how to configure Reverse Proxy for HTTP (80) and HTTPS (443) with rewrite to HTTPS for a Docker container running Ghost blog on port 4343 - the guide is similar for other protocols/ports and applications.
The Ghost blog will become accessible from url blog.example.com in this How To.
What you will need in advance
- You need to have configured a public Synology IP (DDNS)
- You need to have installed one of the Apache HTTP Server X.X packages from Synology Package Center
- You need to own a public domain (example.com)
- You need access to your domain console to add A records
- You should hold a certificate for the domain address you will use (star.example.com certificates is recommended as it allows you to expose more than one url (for example mypage.example.com, blog.example.com etc.))
**1.**The first step is to expose your DSM for HTTP and HTTPS. This is done by opening your router's firewall for HTTP and HTTPS, ports 80 and 443 - as this is specific for each router I won't go into detail but Google is a great friend to get it sorted out.
An alternative to firewall openings (if your router supports it) is to configure "Virtual Servers" against your DSM for HTTP and HTTPS. Quickly explained - a router helps to share a single IP address assigned by the Internet provider among several clients in your home. Virtual servers are preset port mappings for popular services, like a web or e-mail server, that route traffic to a specified client inside the local network
**2.**Now that your ports are ready for traffic we are ready to login to DSM via the web interface.

**3.**After login we will start with creating a Virtual Host for us to be able to rewrite HTTP (80) requests to HTTPS (443) - To do this we need to make a Virtual Host target folder, so go to File Station -> Navigate to the web folder -> create a subfolder called RedirectHTTPS (or whatever you want)

**4.**Now create a file on your local computer named .htaccess (no extension) with the rewrite code below which you upload to the folder RedirectHTTPS.
RewriteEngine on
RewriteCond %{HTTPS} off
RewriteRule (.*) https://%{HTTP_HOST}%{REQUEST_URI}
**5.**Now open DSM Web Station -> navigate to Virtual Host and click the button Create - this will help us to rewrite HTTP to HTTPS using Reverse Proxy
- Choose Port-Based
- Select HTTP and input the port you want to use for rewrite of HTTP to HTTPS (8001)
- Set Document Root to the web folder RedirectHTTPS
- Set HTTP back-end server to Apache HTTP Server X.X
- Set PHP to Not configured
- Press Ok

**7.**Now go to DSM Control Panel -> Application Portal and click the tab Reverse Proxy

**8.**Click Create to set up Reverse Proxy for incoming HTTP requests against http://blog.example.com.
The Reverse Proxy will use the Virtual Host earlier configured (RedirectHTTPS (8001)) to rewrite the HTTP (80) request to HTTPS(443).
- Enter description REDIRECT_blog.example.com
- Set Source protocol to HTTP
- Set Source hostname to blog.example.com (this needs to be same as the public url)
- Set Source HTTP port 80
- Set Destination protocol to HTTP
- Set Destination hostname to localhost
- Set Destination port to the Virtual Host port for web folder RedirectHTTPS which is 8001.
- Click Ok
This will rewrite the incoming URL request for http://blog.example.com to https://blog.example.com - as this is only a rewrite from HTTP to HTTPS the same Virtual Host RedirectHTTPS can be used for all rewrites independent of requested URL (for example blog.example.com and me.example.com can use the same VirtualHost for rewrite to HTTPS).

9. Now we will configure the Reverse Proxy for incoming HTTPS requests against https://blog.example.com.
- Enter description blog.example.comHTTPS
- Set Source protocol to HTTPS
- Set Source hostname to blog.example.com (this needs to be same as the public url)
- Set Source HTTP port 443
- Set Destination protocol to HTTP
- Set Destination hostname to localhost
- Set Destination port to the Docker Ghost blog port 4343 to expose the blog on the URL https://blog.example.com.
- Click Ok

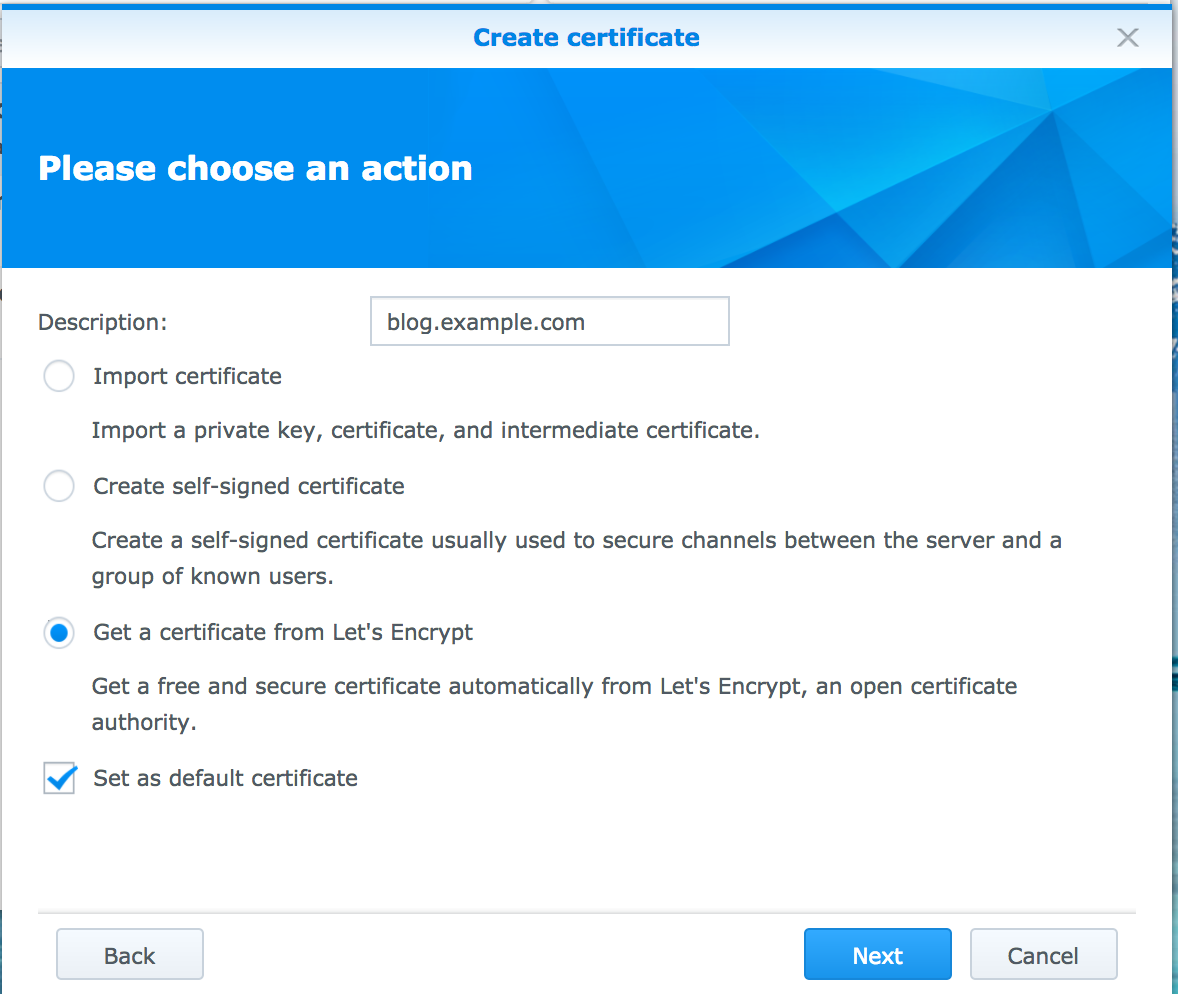
9. Now to have https://blog.example.com be recognized as a secure HTTPS site we need to add the certificate for blog.example.com (or a certificate for star.example.com)
Example of insecure HTTPS site

To add the certificate go to DSM Control Panel -> Security -> Tab Certificate -> click the Add button
- Choose to Add a new Certificate

- Add a Description of the certificate
- In this example we will get a certificate from Let's Encrypt
1.Let's Encrypt is a free, automated, and open certificate authority brought to you by the non-profit Internet Security Research Group (ISRG)
-
Set the certificate as default (optional)
-
Click next
-
Enter Domain name blog.example.com
-
Enter your email to recieve the certificate
-
Set Subject Alternative name - It is a field where you can enter alternative domain names (plural) for which the certificate should also be considered valid.

-
Now the certificate for blog.example.com should be added automatically to your DSM, if not we need to get it from the email account and upload by clicking add -> import certificate (this shouldn't happen)
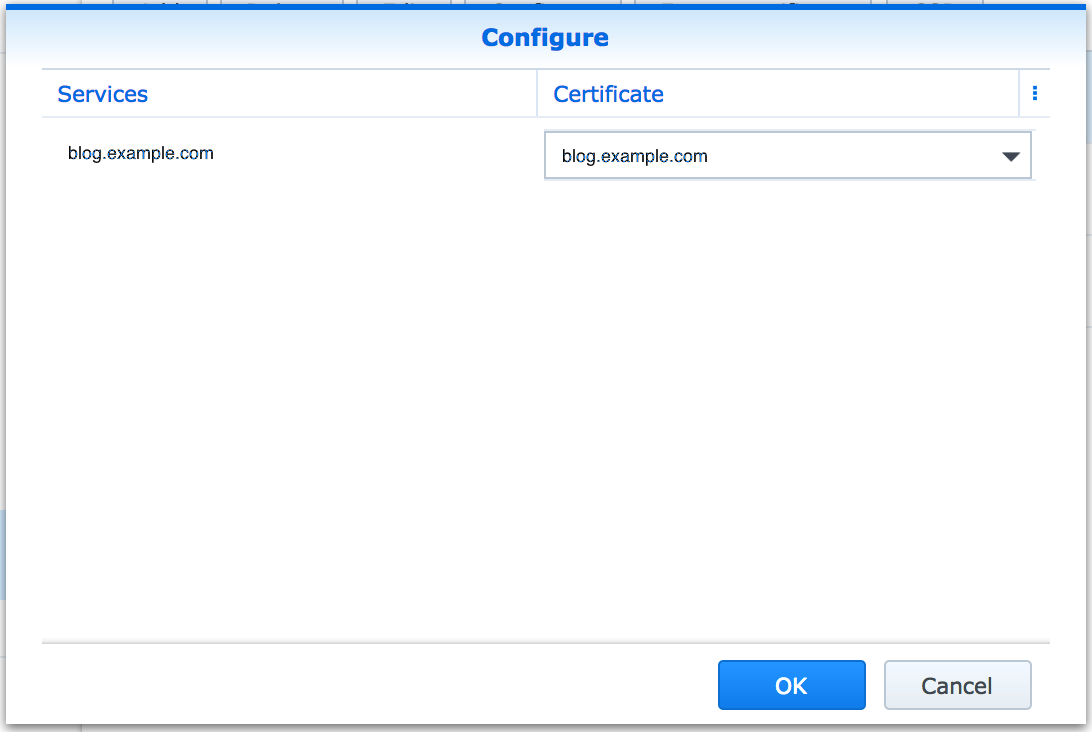
**10.**Now we need to accociate the certificate with our Reverse Proxy for HTTPS https://blog.example.com, to do this click Configure (we are still in Certificate)
Find the service blog.example.com and select the same certificate
**11.**Now everything should be set to configure the A Record with our domain provider, so do the following:
- Go to DSM External Access and take note of your external DDNS IP (example:54.154.154.54)

-
Now go to your Domain provider and add an A Record for blog.example.com which points to the DDNS IP (example: 54.154.154.54)
-
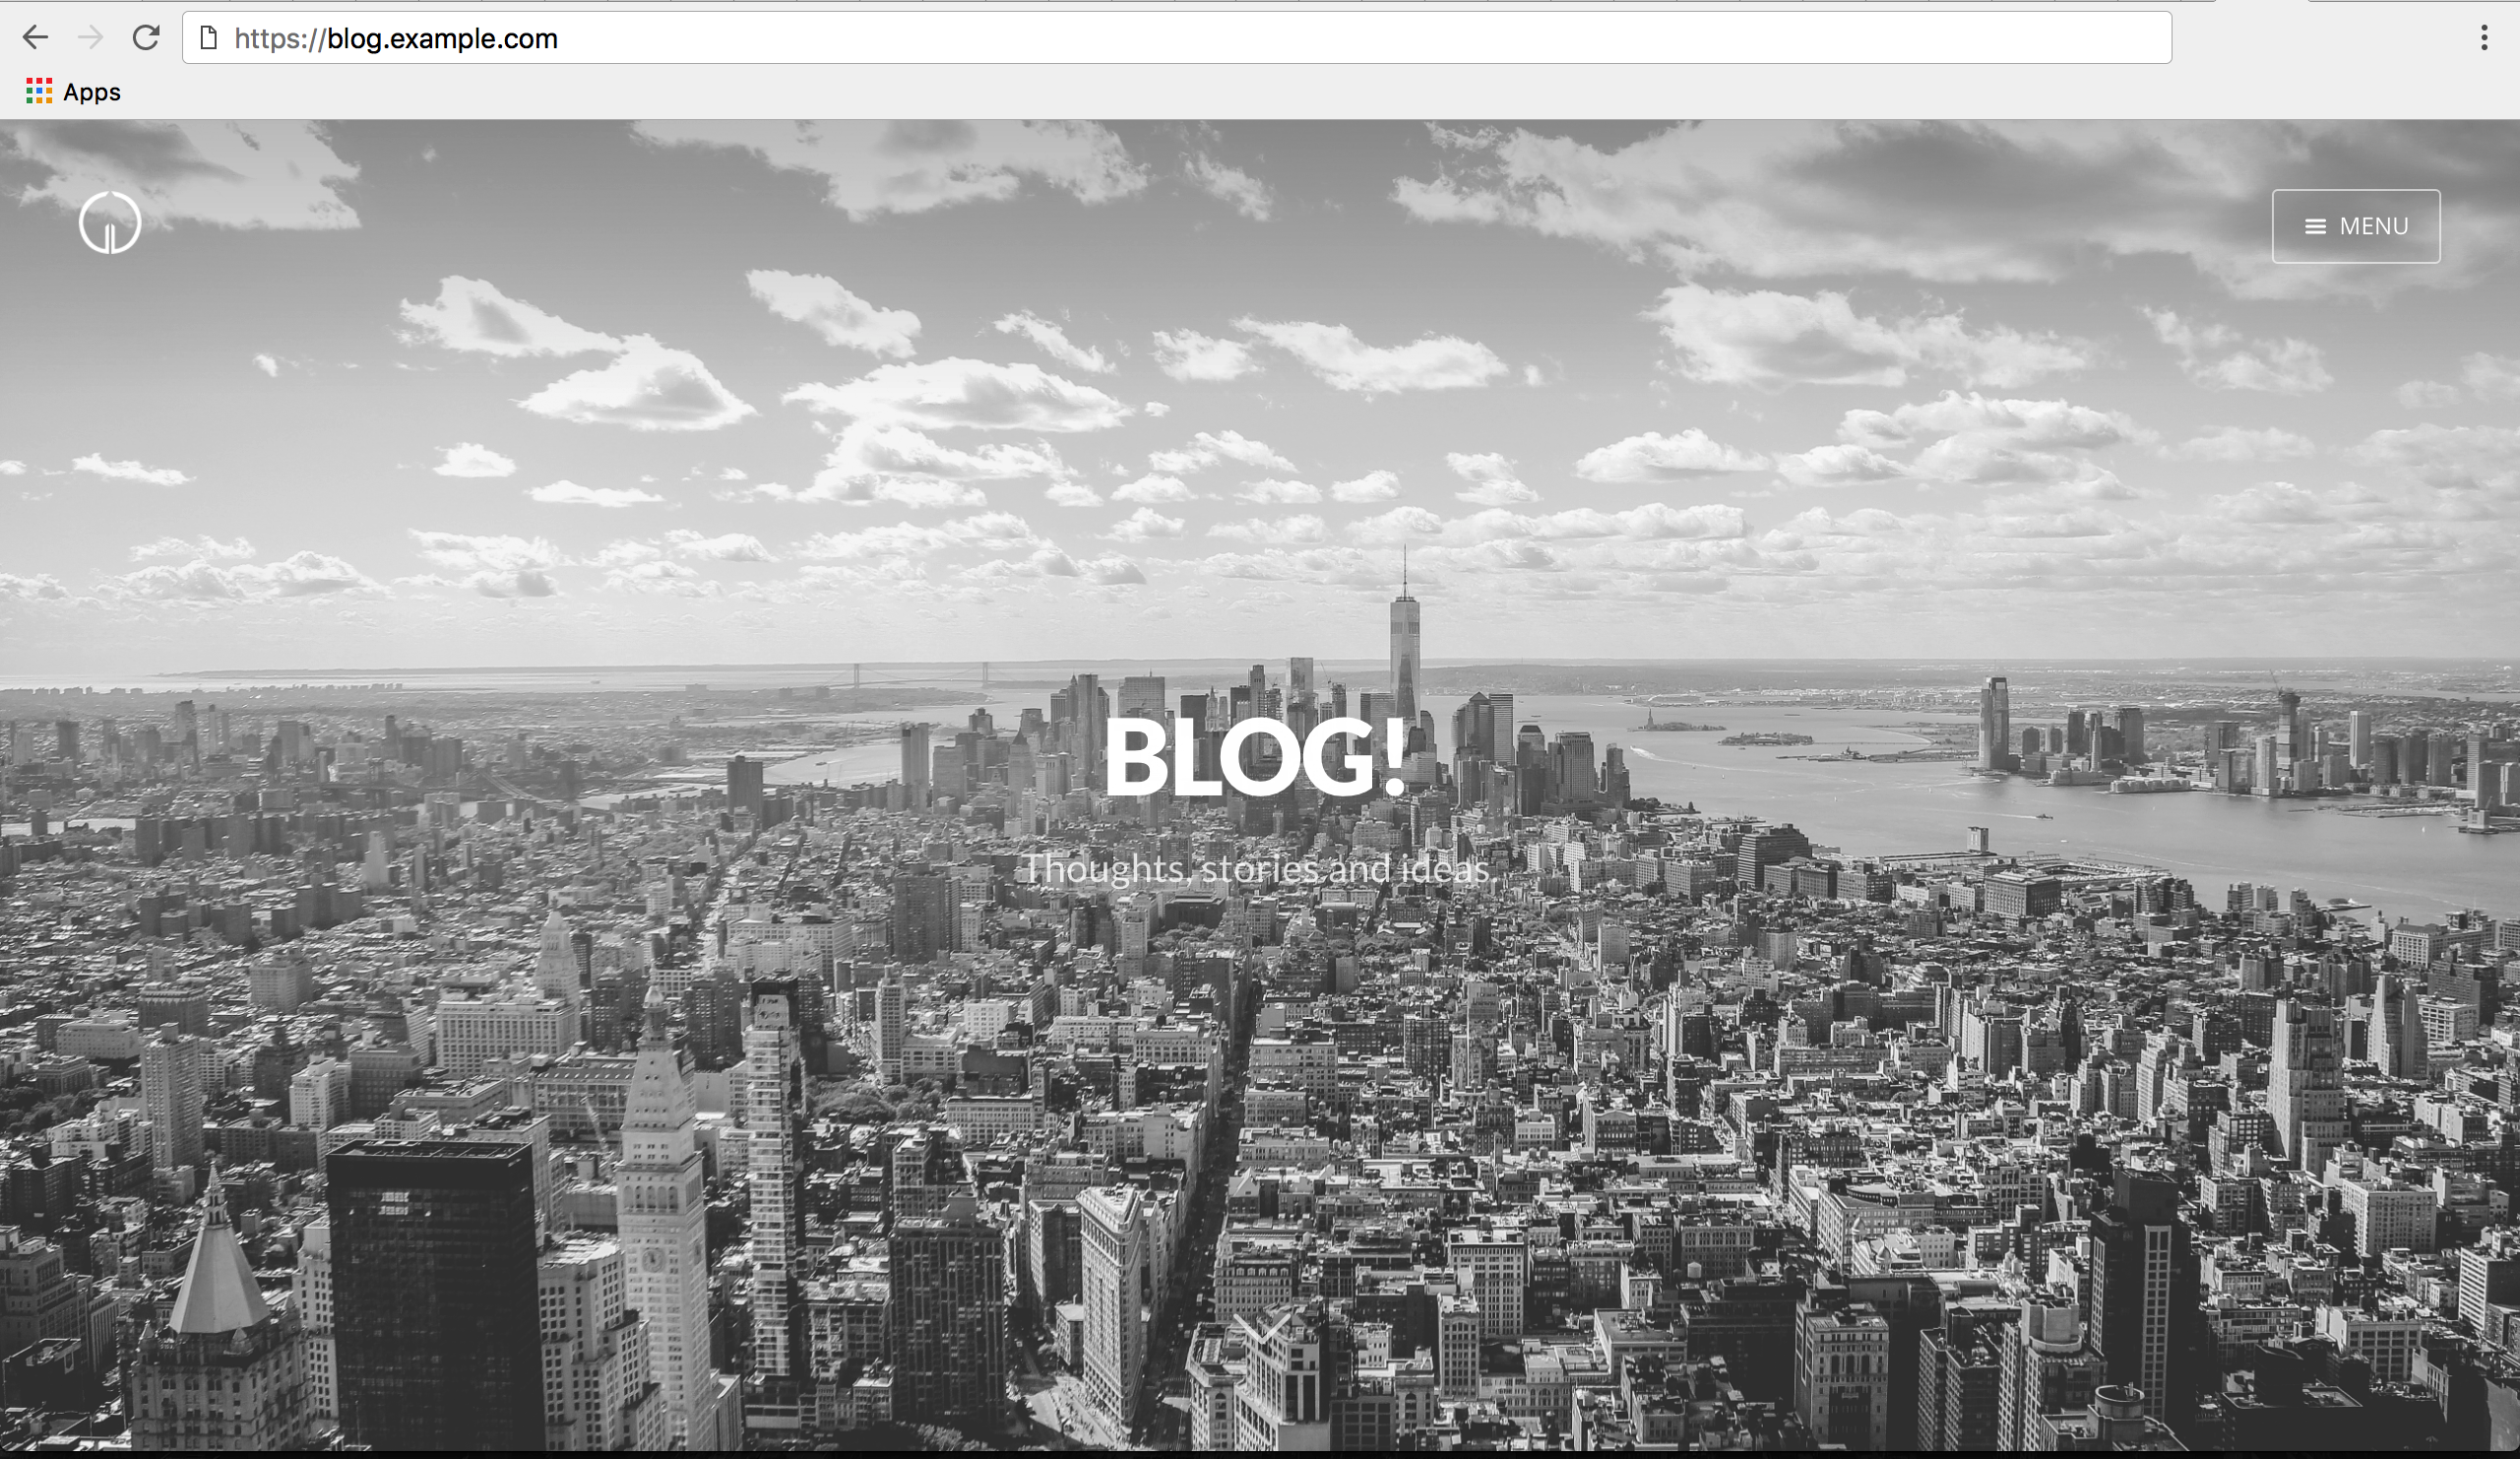
If you now browse http://blog.example.com you should be rewritten to https://blog.example.com and also see the Ghost blog.
Bonus party trick from @Jeroen
Now you can simplify the number of redirection rules you need to create of HTTP to HTTPS by doing as Jeroen have suggested in the comments, to do this you will need to configure your port forwarding rule on your local router to route HTTP (port 80) requests to say port 81 on your Synology NAS (port 80 cannot be used on NAS), by doing this you can end up having just one HTTPS redirect rule as below


This will redirect any host from HTTP to HTTPS coming in on port 80 to your routers public ip, now you only have 1 redirection rule


