Synology - Configure Docker with Ghost Blog

The Docker package offered on the Synology DSM is a great tool for learning and easily creating applications which would be hard to run otherwise. The biggest benefit with Docker in my point of view is all the available applications you can test and play around with - you can even make your own containers with your custom apps!!
Now, this post will explain how to download and install the Docker package on the Synology DSM and explain how to easily set up a Docker container running the application Ghost - Ghost is an open source publishing platform which is beautifully designed, easy to use, and free for everyone.
It is recommended to run Docker on Synology's with an Intel chipset - this is because it is required to take full advantage of all Docker functionality. To find out if your Synology has an Intel chipset, check of the following url.
https://www.synology.com/en-uk/knowledgebase/DSM/tutorial/General/What_kind_of_CPU_does_my_NAS_have
(Check if it says Intel in the CPU Model column of your Synology version, also for best experience CPU, and Memory should be considered)
1. Installing Docker on the Synology DSM
To install Docker on Synology DSM open the Package Center -> Search for Docker -> Action -> Install

When installation completes you should see docker in the main menu
2. Configure Docker root data folder for applications
Now after installing Docker we should configure a root data folder for the applications data (shared-storage volume), to do this we need to connect to the DSM using SSH and elevate our session to root privileges (sudo su), this requires you have admin/root access with your account.
- If you dont know how to SSH and elevate to root check out this post
https://www.synology.com/en-us/knowledgebase/DSM/help/DSM/AdminCenter/system_terminal
- Also, I would recommend setting a custom SSH port as the default port for SSH, port 22 is a well known port used by hackers to get access to network clients.
So, log into the Synology DSM using terminal and elevate your session to root.
The reason for creating the root data application folder is to keep the Docker containers applications data in its own folder structure, this to keep the overall DSM folder structures untouched and clean as well as making backup of Docker data simple. So go ahead and create the following folder and set the permissions to the root user.
mkdir -p /volume1/docker/
chown root:root /volume1/docker/
(With the current DSM Docker package version it is root that currently runs Docker in its context and hence the owner of the root application folder should also be the same).
Optional but recommended (this post will use this)
Now to separate "manual/custom" Docker applications (like the coming Ghost installation) from DSM Docker native applications installed via the Docker Registry it is suggested to create a personal subfolder within /docker, again this is just for cleaner structure and a choice you need to make yourself. If you follow the general advise create the following folder:
mkdir -p /volume1/docker/personal
The finale Docker root data folder structure should be like this.
├── volume1
│   └── docker
│       └── personal
3. Create Docker Container
There is two ways of creating a Docker containers on Synology DSM, I will show both in detail but below is the differences.
-
Install containers using Registry through the Docker application in Synology GUI. Configure the containers through the Synology GUI by adding volumes, ports and environment details manually on each container.
-
Install containers using docker-compose.yml files which holds the full configuration of the Docker container. Its very easy to use docker-compose.yml when the file is ready, but it can be difficult to create (docker-compose.yml files dosn't handle tabs, only spaces - this is one of the core reasons for syntax errors - personal experience ;))
4. Pre-requisites - Configure Ghost data folder
As we want to split personal Docker Container data from Synology DSM Docker standard containers we need to create the Ghost blog data folder before creating the Docker Ghost container.
To create the folder and set the right permissions run the following
mkdir -p /volume1/docker/personal/ghost
chown 1000:1000 /volume1/docker/personal/ghost
This should now be your new folder structure
├── volume1
│   └── docker
│       └── personal
│           └── ghost
5. Create Docker Ghost Blog Container - Synology GUI
Now we are ready to install and configure the Ghost Docker Container and this section will explain how to do this using the Synology GUI.
- Open you Synology DSM and open the Docker application
2. When docker has opened go to Registry -> Search for Ghost
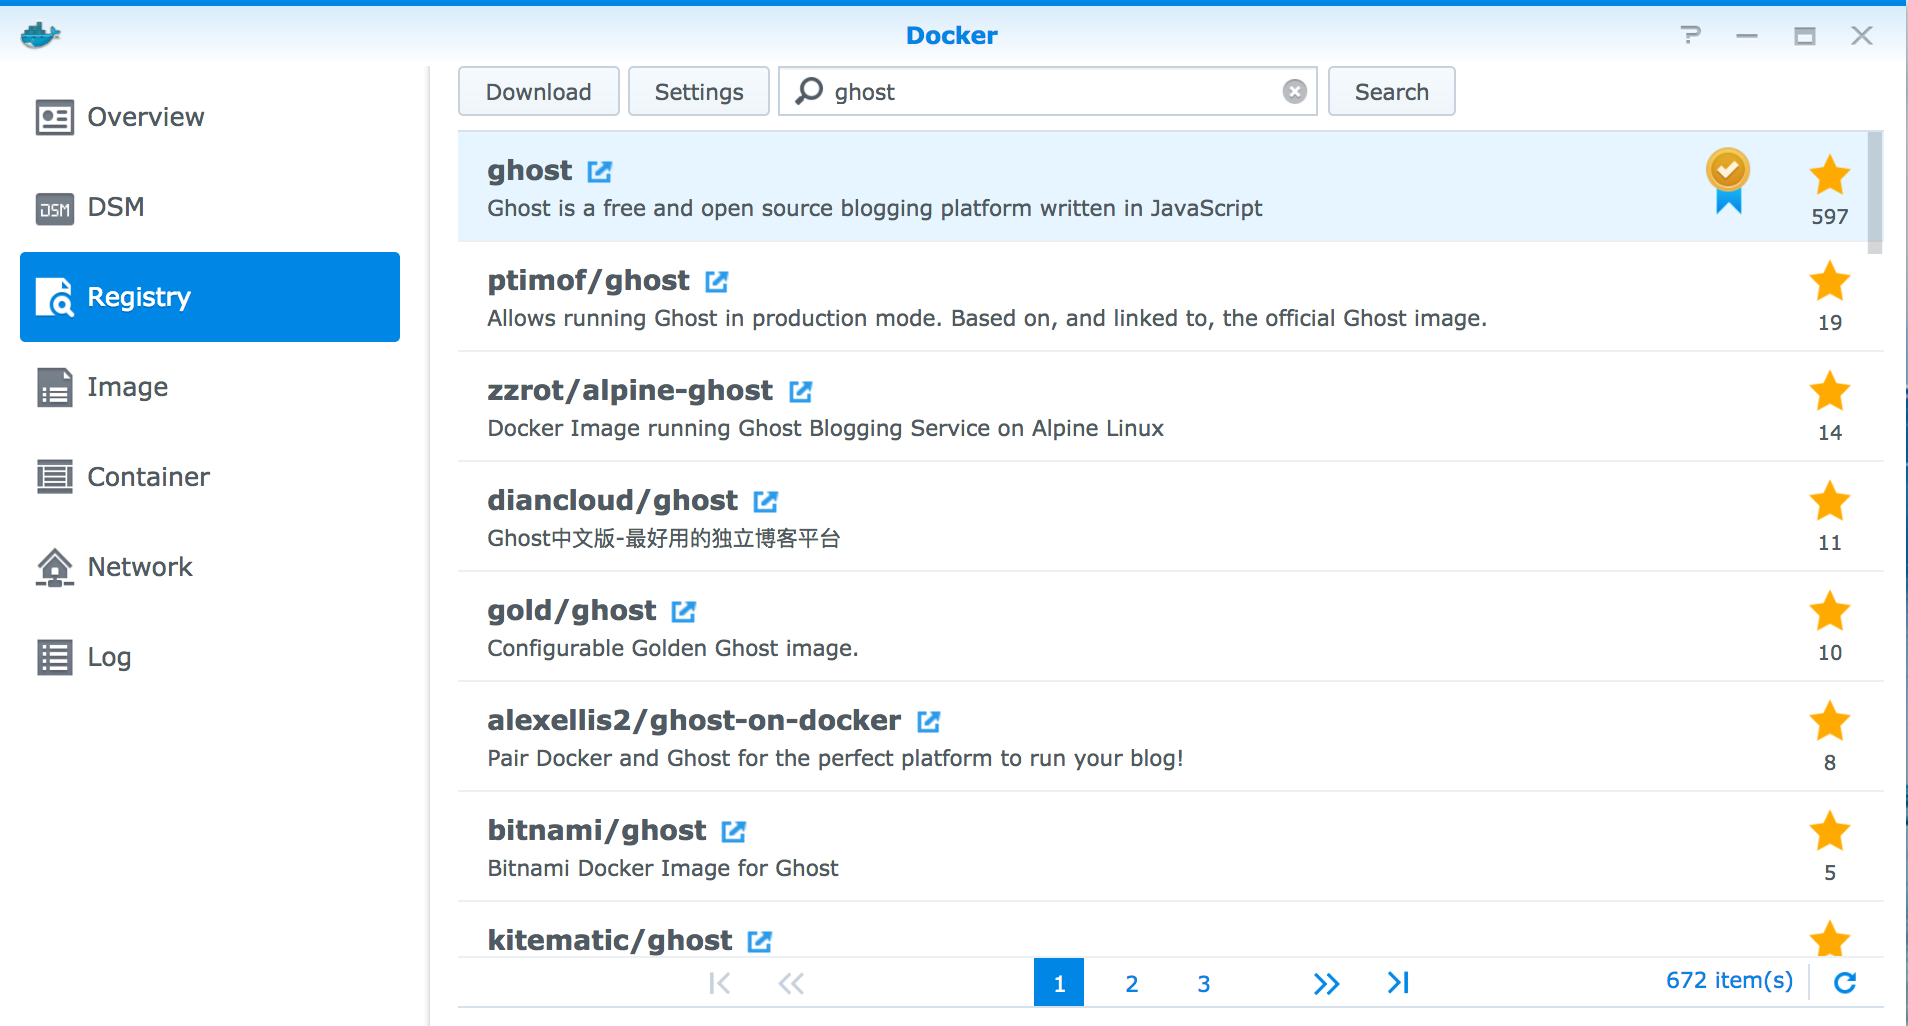
3. Mark the one name ghost an click download
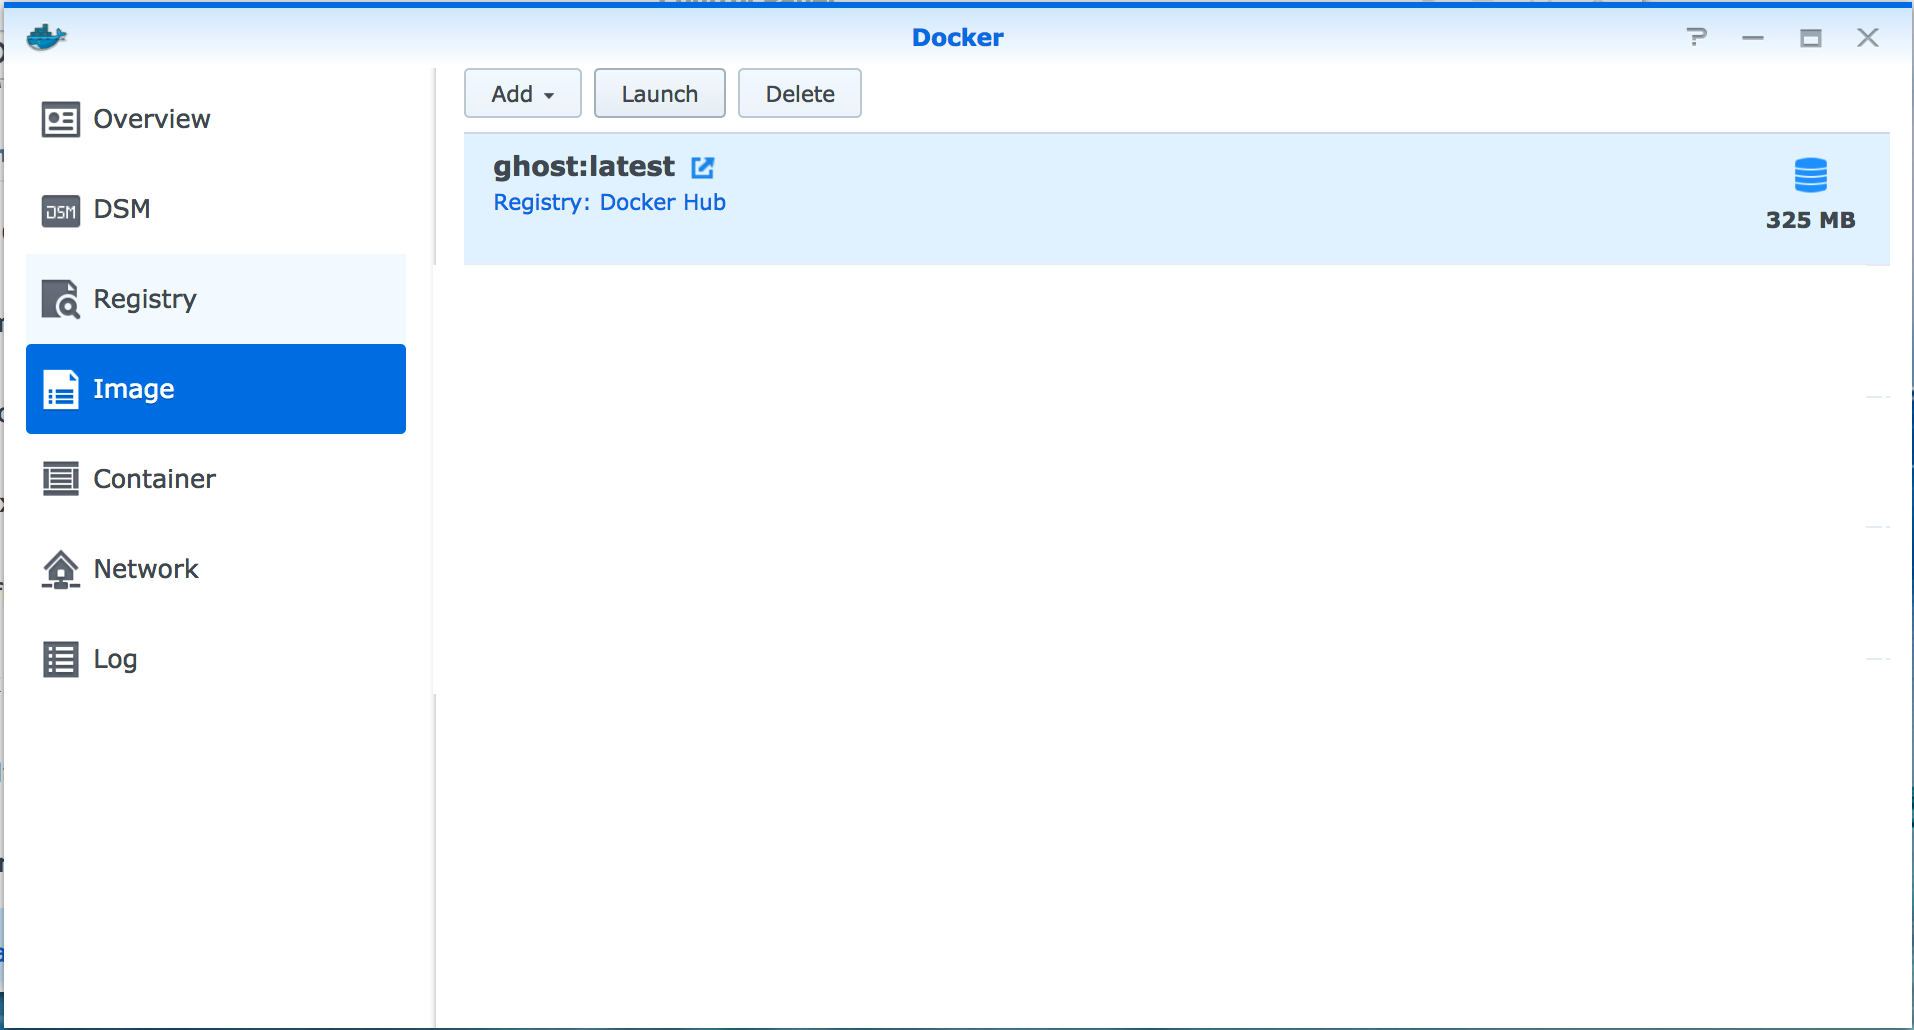
4. Go to Image and wait for the download to complete, when complete mark ghost:latest and click launch
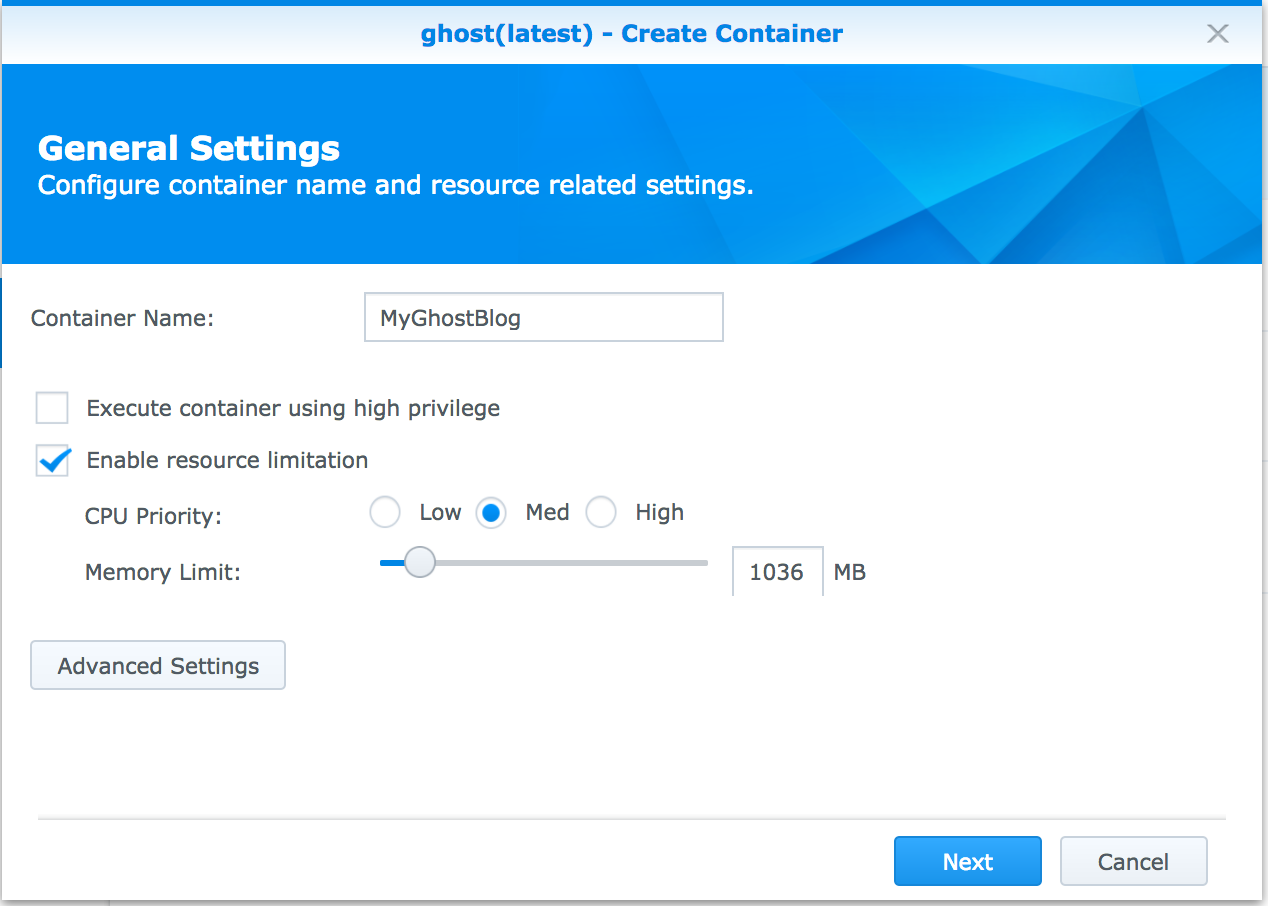
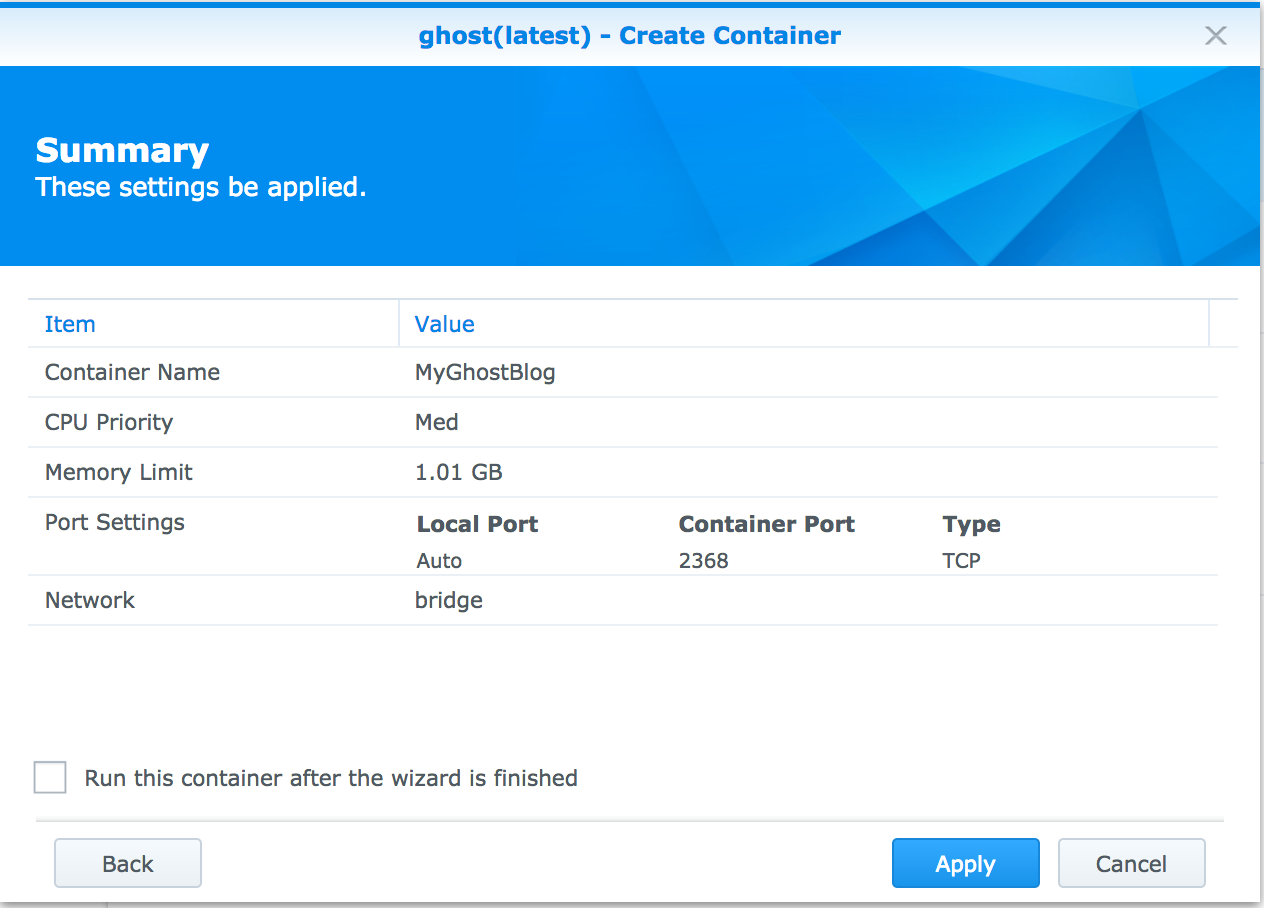
- Enter Container Name, set Resource Limitation (optional) and click Next
- Verify your settings and uncheck the "Run this container after the wizard is finished"
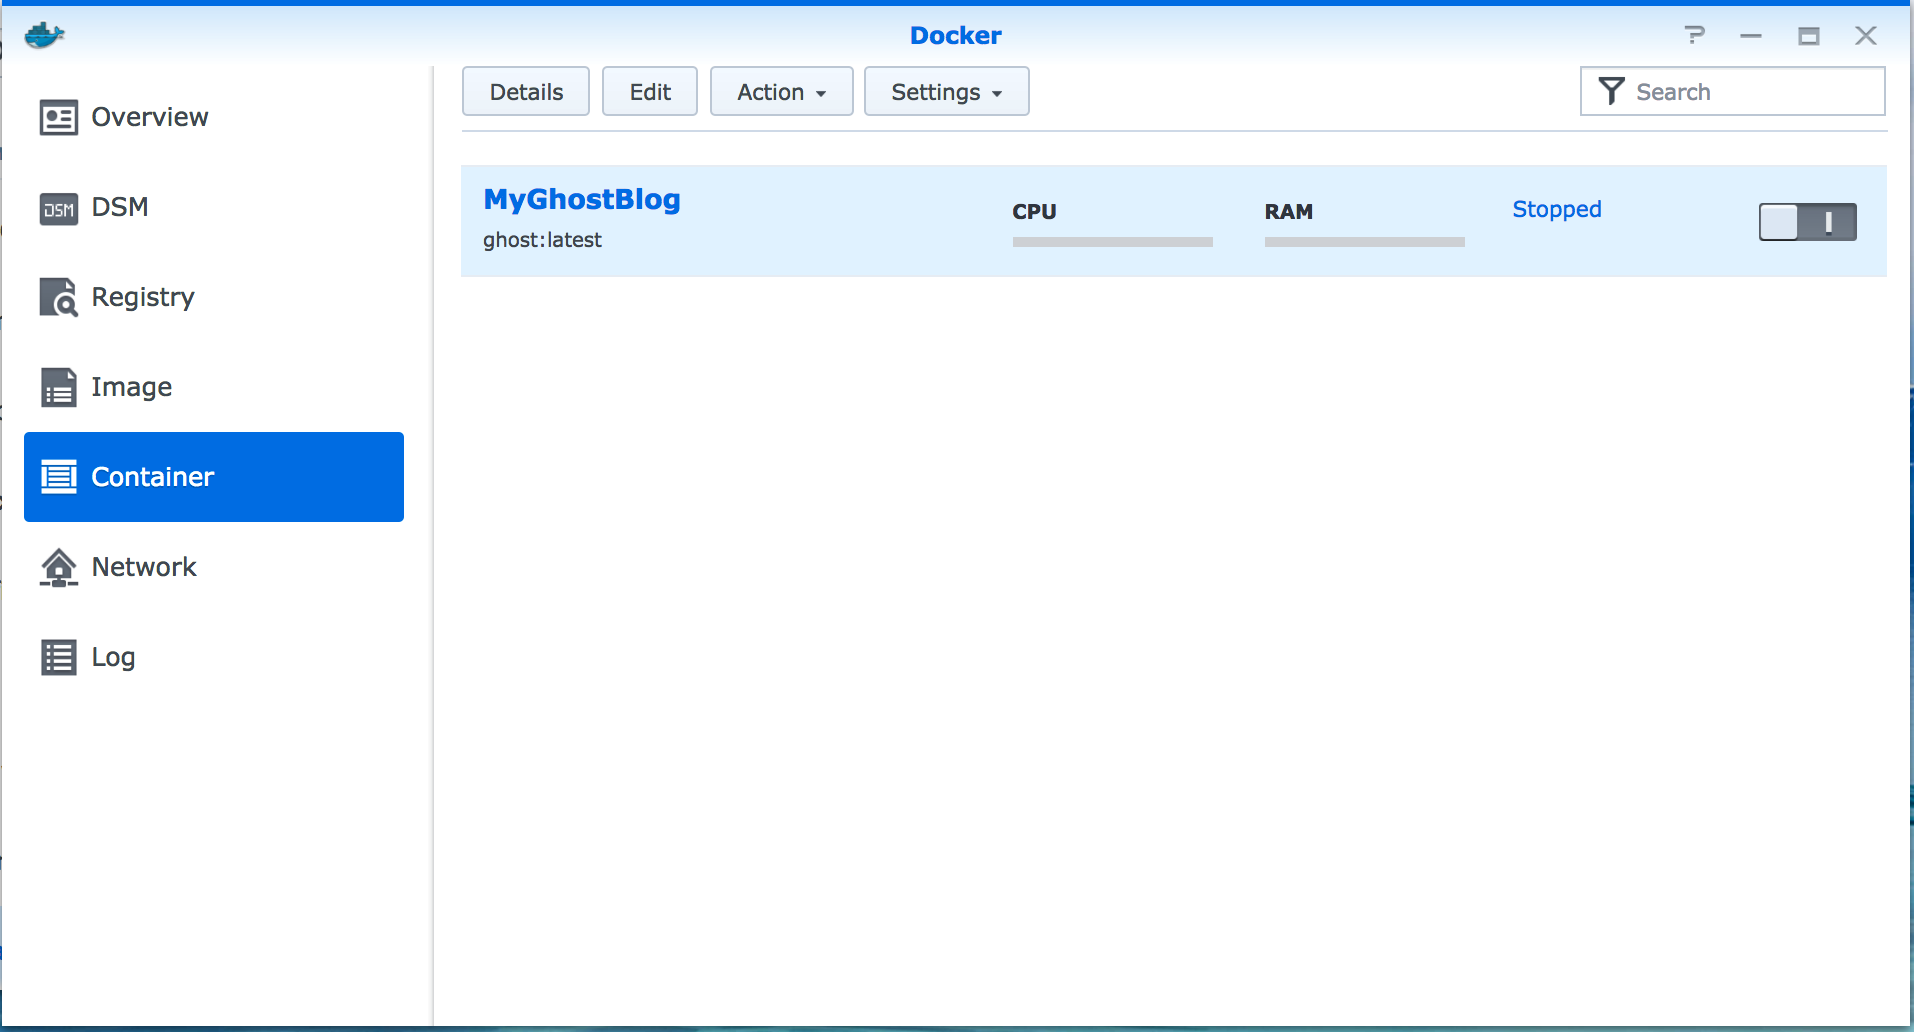
- Go to Container -> Mark your Docker Ghost Container (MyGhostBlog) -> click Edit
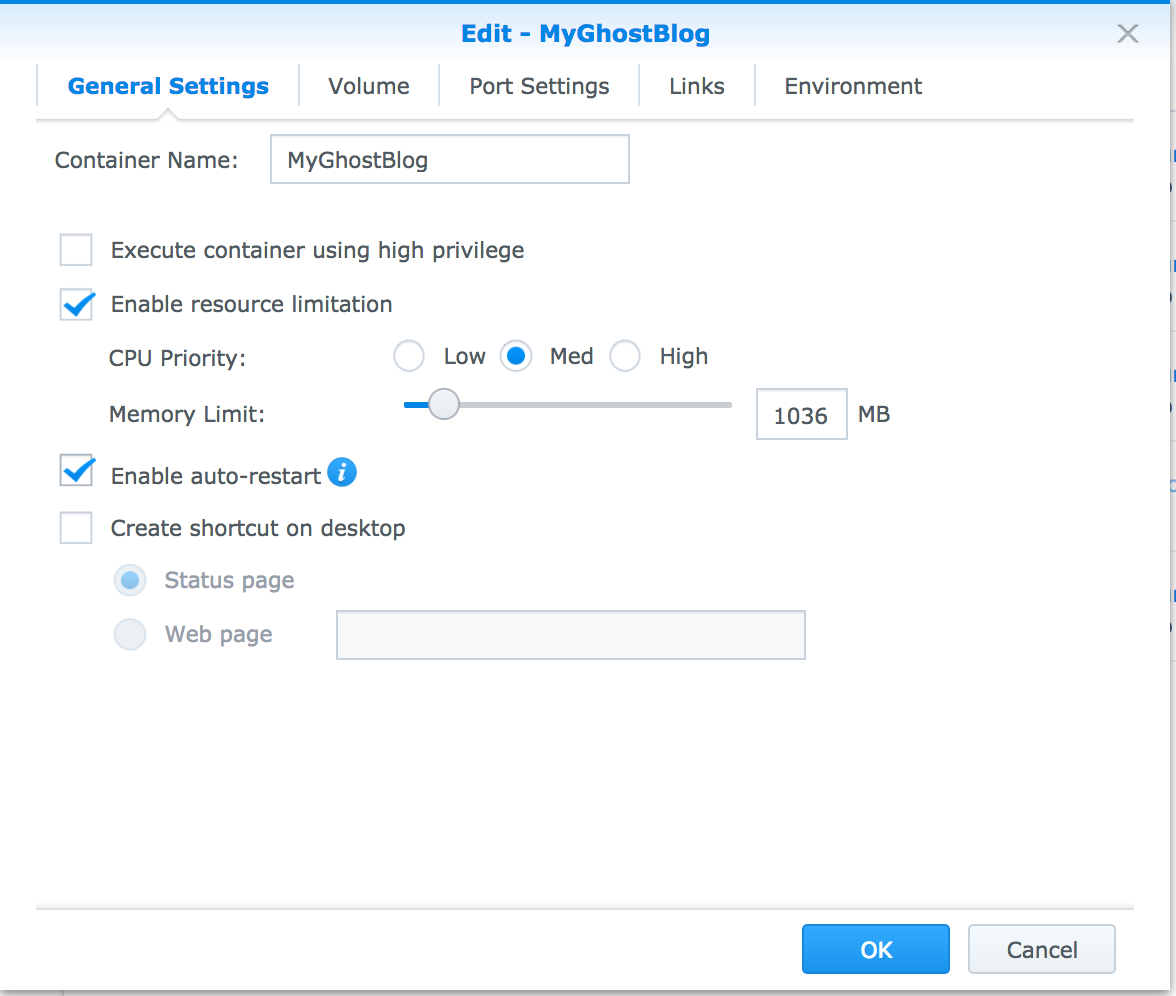
- In tab General Settings check the box enable auto-restart
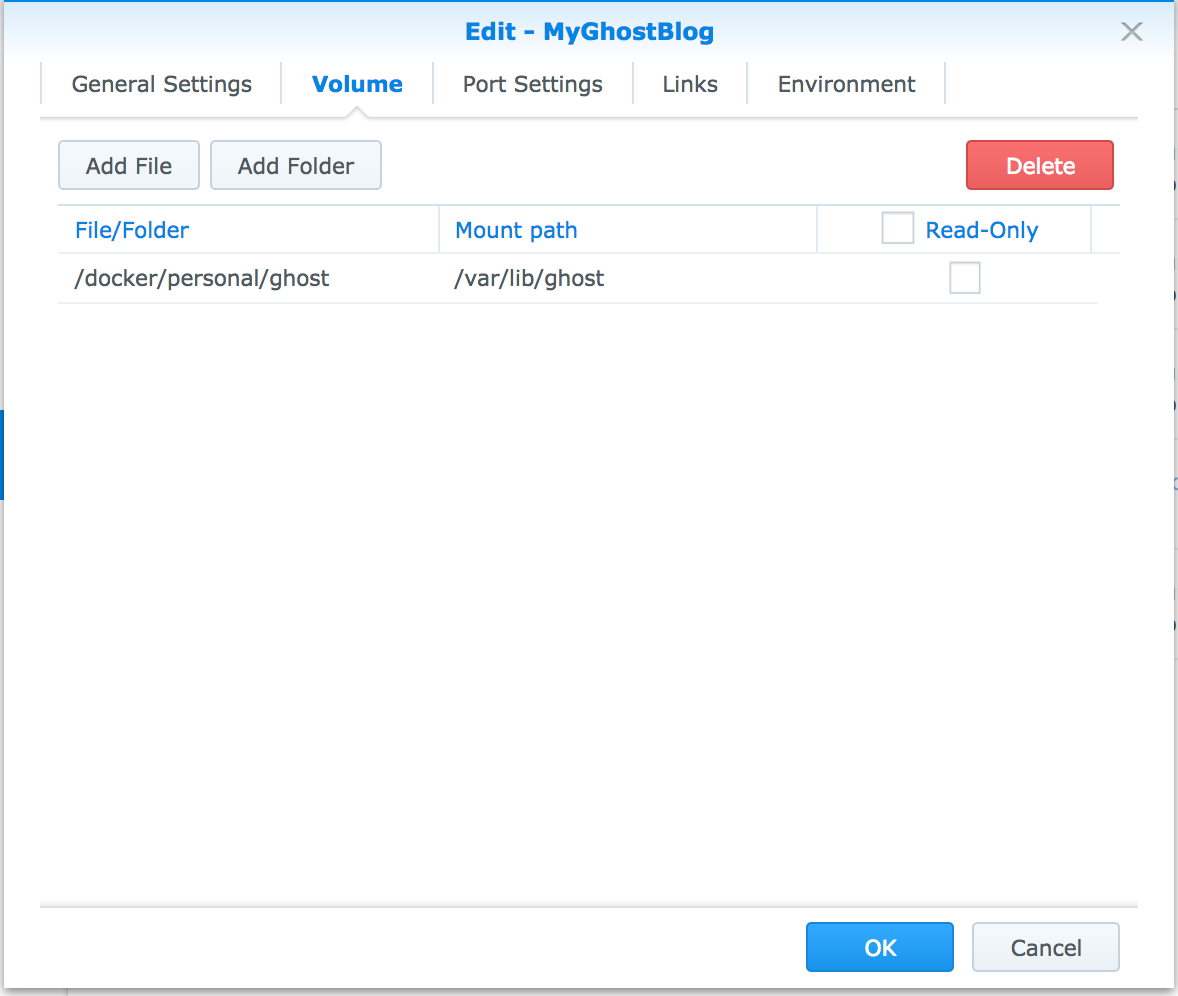
- In Volume tab we now need to map the created folder for our Ghost data (section 4) with the Docker Ghost Containers data folder. This will make it possible for us to change Ghost theme, config, image and data files being used by the Docker Ghost Container.
- Created Ghost data folder:
(/volume1/docker/personal/ghost) - Ghost Container data folder: (/var/lib/ghost)
Click the Add folder and choose the folder docker/personal/ghost, for mount path write /var/lib/ghost
10.In the Port Settings you should map a local port against the containers Ghost port - in this example we map against port 8080
With this we can map the Docker Ghost Container further against a Reverse Proxy or expose it directly through the Router and Firewall.

11.The Links tab can be skipped.
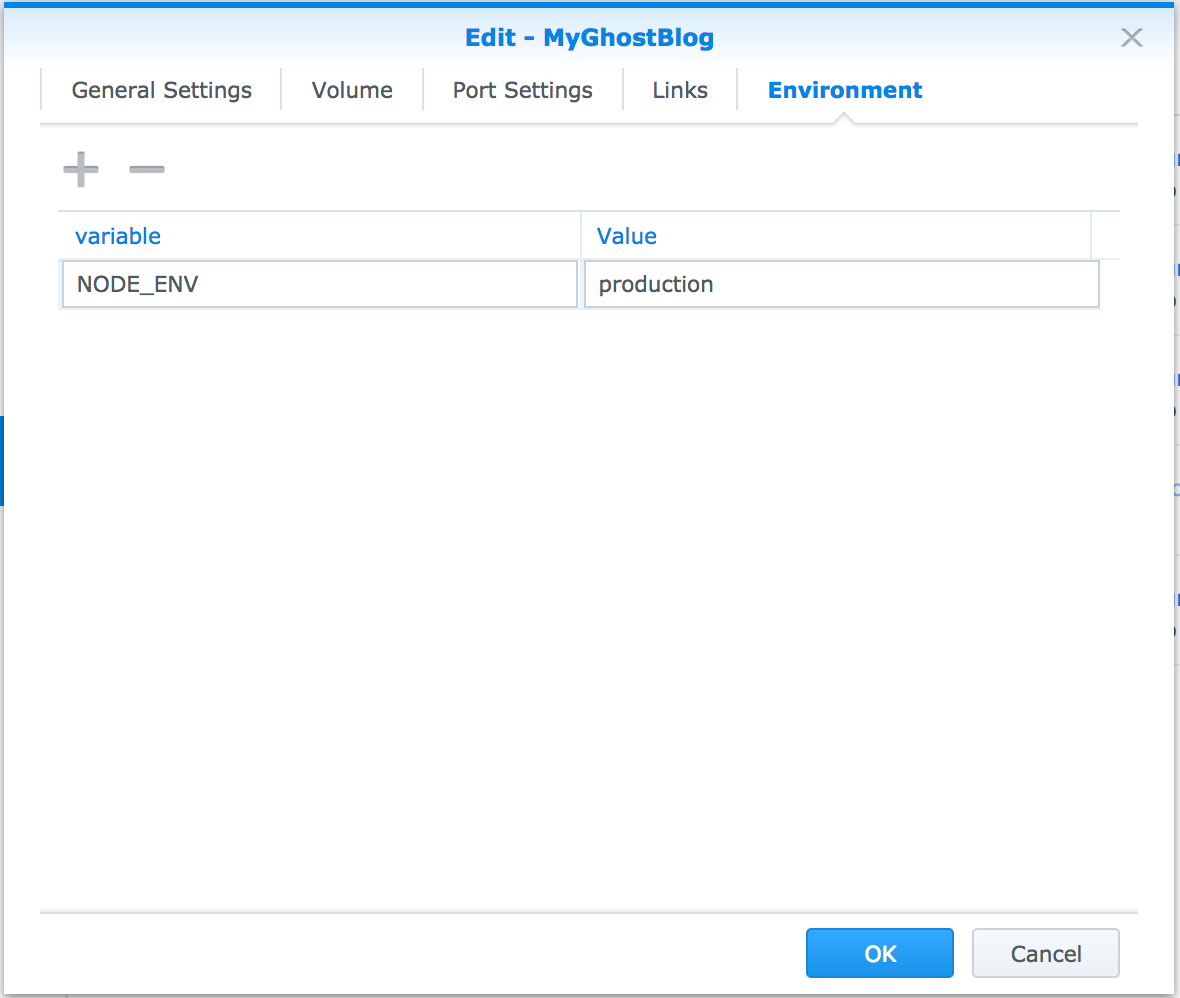
12.In the Environments tab we need to add one custom setting which tells the Ghost Container which environment configuration we are going to use (production, development, testing).
Production:
- Variable: NODE_ENV
- Value: production
Development:
- Variable: NODE_ENV
- Value: development
Testing:
- Variable: NODE_ENV
- Value: testing
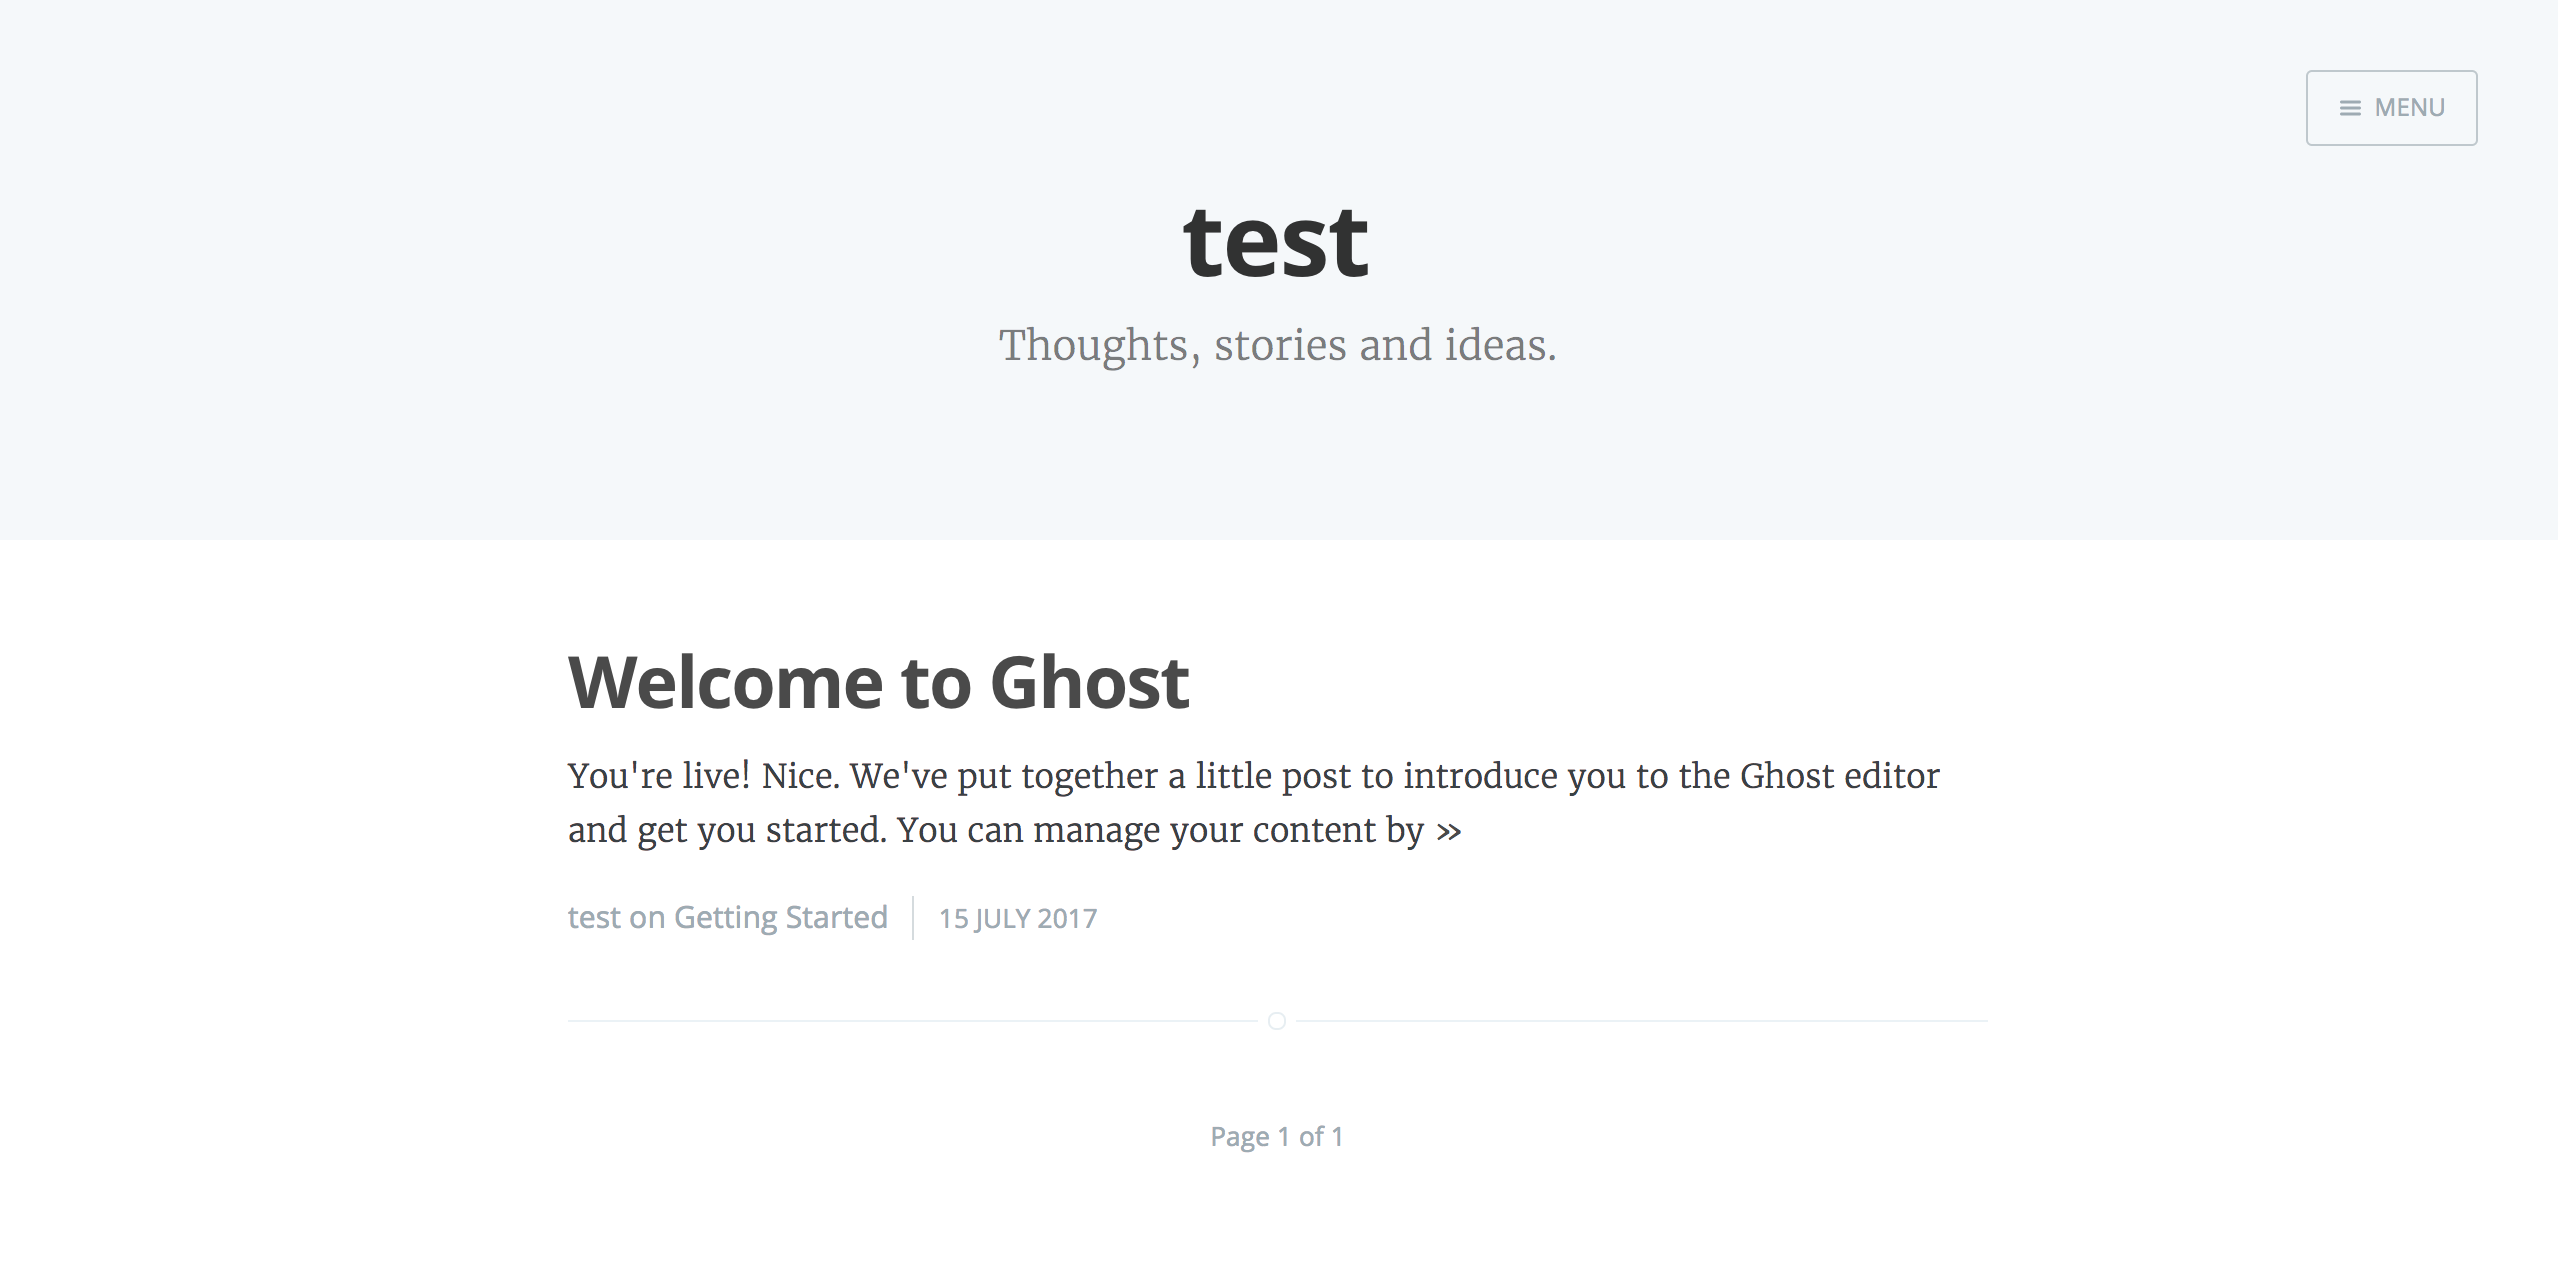
13.Now all is ready, you can click ok and then start up your Docker Ghost Container by swiping the slider to I - as soon as its started you can connect to your Synology DSM's IP with the port number (192.168.0.xxx:8080) to see the default Ghost landing page.
Congratulations, if you see this then you have successfully configured Docker Ghost Blog Container!
14.If you want to see/change the Ghost config.js file, your ghost database, blog images or themes just go on to your created data folder for ghost
/volume1/docker/personal/ghost
Here you can do changes (some requires restart of the Ghost Container) to the config, themes etc.
6. Create Docker Ghost Blog Container - docker-compose.yml
Now we are ready to install and configure the Ghost Docker Container and this section will explain how to do this using a docker-compose.yml file. I'm not going to lie, this is my preferred way of configuring Docker containers as it makes upgrading, recreating etc. so much easier! So lets get started!
-
Open terminal and log into your Synology DSM with SSH and elevate your session to root by running sudo su (requires administrator privileges, see earlier chapter)
-
Now create the following folder
mkdir -p /volume1/docker/personal/ghost/ghost
chown 1000:1000 /volume1/docker/personal/ghost/ghost
- This should now be your new folder structure
├── volume1
│   └── docker
│       └── personal
│           └── ghost
│               └── ghost
- Now we need to create the docker-compose.yml file, you can either do this on your computer and upload the file to the path /volume1/docker/personal/ghost or you can create it with nano or vi editor (or some other editor if you want). Add the content below to the file, edit the container_name, left port, NODE ENV and the left path if you haven't created as in this post.
(It is very important that the file is structured as below and that it doesn't contain any tab's, just one tab will break the file)
version: '2'

services:
  ghost:
    restart: always
    image: ghost:latest
    container_name: MyGhostBlog
    ports:
    - "8080:2368"
    volumes:
    - /volume1/docker/personal/ghost/ghost:/var/lib/ghost
    environment:
    - NODE_ENV=production
- Now is the fun part - open terminal, elevate with sudo su, navigate to /volume1/docker/personal/ghost and run the command docker-compose up -d
If you now open the Synology DSM Docker application through the GUI you will see the Container has appeared, and started.
As soon as it has fully started you can connect to your Synology DSM's IP with the port number (192.168.0.xxx:8080) to see the default Ghost landing page.
Congratulations, if you see this then you have successfully configured Docker Ghost Blog Container!
- If you want to see/change the Ghost config.js file, your ghost database, blog images or themes just go on to your created data folder for ghost
/volume1/docker/personal/ghost
Here you can do changes (some requires restart of the Ghost Container) to the config, themes etc.
If you want to upgrade Ghost you can just delete the Docker Container through Synology GUI (remember all data is stored in your /personal/ghost folder) and then followed by a new docker-compose up -d through terminal, its that simple!!
Expose the Ghost Blog using Reverse Proxy
If you want to expose your Ghost Blog to a sub-domain of your domain, or maybe even as your domain web site I have earlier made a post on this as well, check it out if you want ;)
Synology - Reverse Proxy with HTTP to HTTPS rewrite
/2017/07/14/synology-reverse-proxy/


